How to Choose the Right Fuel Cell Kit for Your Projects
Choosing a fuel cell kit involves more than selecting the tank capacity. You should also consider the available mounting space, expected operating time, full-tank weight, engine fuel demand, fuel type and whether the vehicle is intended for drag racing, drifting, track use, off-road use or limited street driving.
Choose by Automotive Fuel Tank Capacity
Capacity
Tank Dimensions
Best For
Buying Considerations
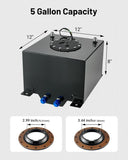
5 Gallons
12 × 12 × 8.26 in
Drag racing, short-duration competition, lightweight builds and installations with limited space
Offers the lowest weight and smallest footprint, but requires more frequent refueling
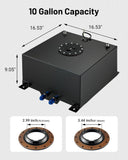
10 Gallons
16 × 16 × 9.05 in
Drifting, autocross, street-and-strip builds and multi-session track use
Provides a practical balance between fuel capacity and installation space
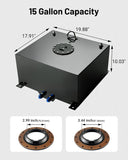
15 Gallons
19.88 × 17.97 × 10.03 in
LS swaps, restomods, off-road builds and modified vehicles requiring longer operating range
Requires more mounting space and a support structure capable of carrying the full-tank weight
Automotive fuel tank capacity does not directly determine driving range. For street use, estimate the range using the vehicle’s actual MPG and maintain a safe fuel reserve. For track use, also account for warm-up time, staging or grid delays, return-line fuel circulation and fuel that may become temporarily unavailable to the pickup during hard acceleration, braking or cornering.
Choose by 6AN Evil Energy Fuel Line Material
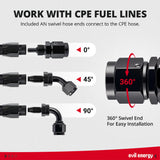
CPE fuel hose is a flexible, cost-effective choice for conventional gasoline street vehicles and many performance builds. It is easy to route and suitable for general-purpose fuel systems, but it is not recommended for E85, methanol, or long-term exposure to high-ethanol fuels.
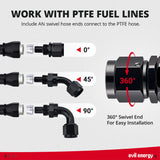
PTFE fuel hose offers greater chemical resistance and lower fuel-vapor permeation than CPE hose. It is suitable for gasoline and E85 applications. When using ethanol-blended or specialty fuels, confirm that the fuel pump, pressure regulator, filter seals, fittings, and fuel cell foam are also compatible with the selected fuel.
Conductive PTFE fuel hose features a conductive inner liner that helps dissipate static electricity generated by fuel flow. It is commonly selected for high-flow diesel systems and other applications where static control is a priority. Verify that every component in the system is compatible with diesel fuel and the required operating pressure.
Fuel compatibility must be evaluated across the entire fuel system. A compatible hose does not automatically make the complete kit compatible—the tank or fuel cell foam, pump, regulator, filter seals, fittings, and hose must all be rated for the fuel being used.
Standard vs. Upgraded Fuel Cell Kit: Which One Should You Choose?
Both EVIL ENERGY fuel cell kits include the same core fuel-system components: a fuel cell tank, 300 LPH fuel pump, two-stage filtration, adjustable fuel pressure regulator, 20 ft of 6AN fuel hose, and the required tank and fuel pump adapter fittings. The main difference is the number of 6AN hose ends included.
Component
Standard Fuel Cell Kit
Upgraded Fuel Cell Kit
5/10/15 Gallon Fuel Tank
Included
Included
300 LPH Fuel Pump
Included
Included
100-micron pre-filter and 10-micron post-filter
Included
Included
Adjustable Fuel Pressure Regulator
Included
Included
20 ft of 6AN Fuel Hose
Included
Included
Tank and Fuel Pump Adapter Fittings
Included
Included
Straight 6AN Hose Ends
Select separately based on your routing
8 included
90-Degree 6AN Hose Ends
Select separately based on your routing
4 included
Best For
Builders who already have some hose ends or want to choose each fitting angle individually
Builders who want a more complete package with fewer fittings to purchase separately
Choose this Standard Fuel Cell Kit if you already have compatible 6AN hose ends or want full control over the number and angle of each fitting. This option lets you build the hose-end package around your exact fuel-line layout.
Choose the Evil Energy Upgraded Fuel Cell Kit if you want to reduce separate parts ordering. It includes eight straight and four 90-degree 6AN hose ends, giving you a more complete starting point for a typical custom installation.
Before You Order: Plan the supply and return hose routing, then count the straight and angled hose ends required at the tank, pump, filters, regulator and engine. If your installation requires multiple hose ends, compare the Standard and Upgraded Fuel Cell Tank Kits before purchasing to determine which package better matches your layout.
Fuel Cell Kit Components and Fuel Flow Diagram
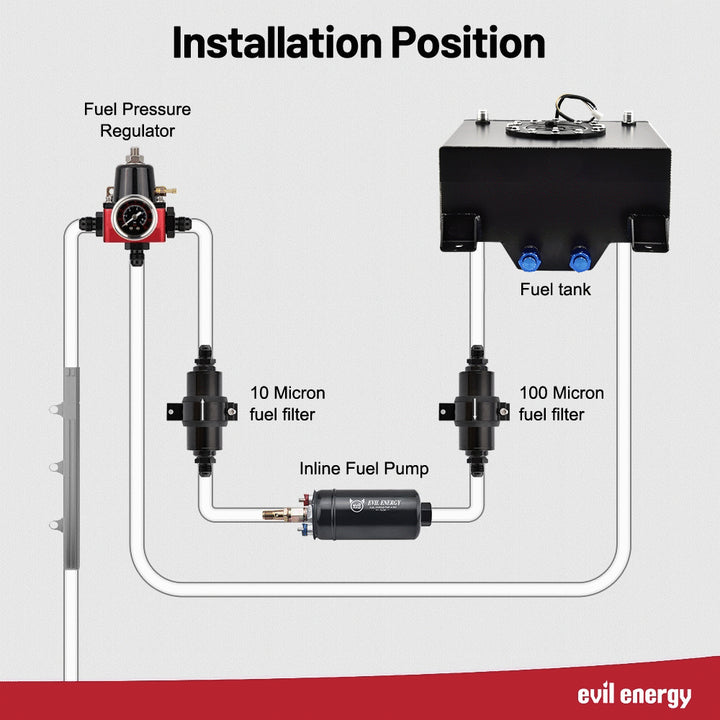
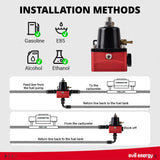
A clear fuel tank parts diagram helps installers identify each component, follow the correct fuel-flow direction and avoid common problems such as reversed filters, a restricted pump inlet or an incorrectly connected return line.
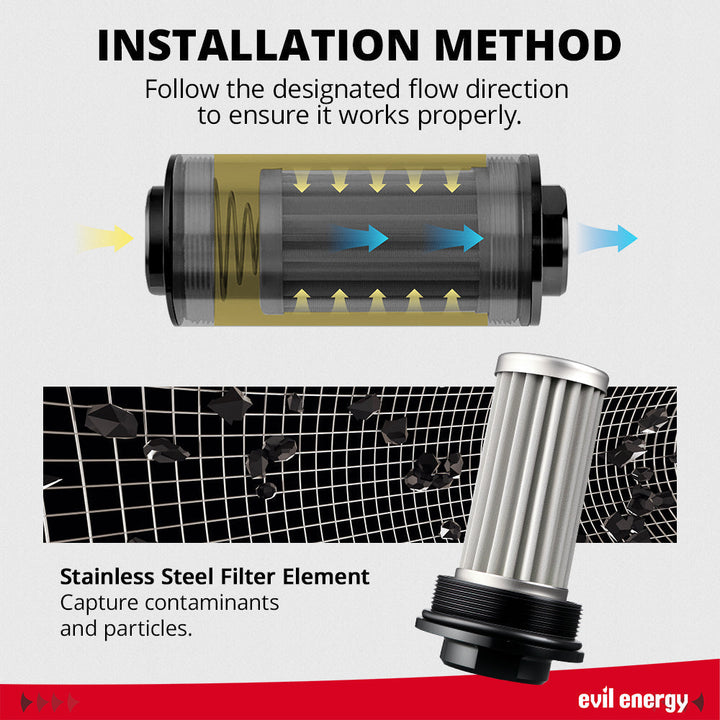
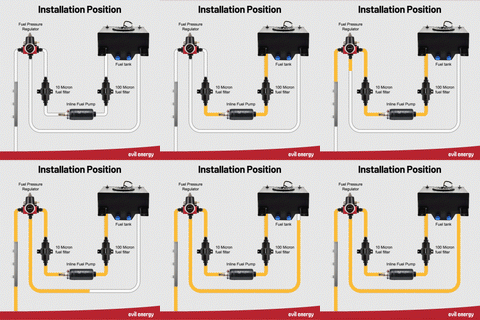
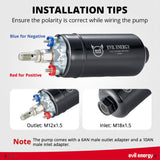
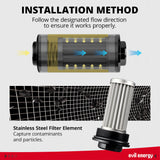
Follow the filter flow direction. Install the 100-micron filter before the pump and the 10-micron filter after the pump. The arrow on each filter housing must point in the direction of fuel flow.
Mount the external pump correctly. Position the pump low and close to the fuel cell so the inlet receives a gravity-assisted fuel supply. Keep the inlet hose short and minimize sharp bends. Use the supplied bracket with appropriate vibration-isolating hardware, and protect the pump from road debris and exhaust heat.
Use the correct hose ends. PTFE hose requires hose ends specifically designed for PTFE construction. Standard CPE hose ends must not be installed on PTFE hose because the internal support and sealing design are different.
Secure and protect the fuel lines. Support the feed and return lines with fuel-safe clamps to prevent movement and chafing. Keep both lines away from hot surfaces, sharp edges, steering components, suspension travel and the driveshaft.
Keep the vent and return paths open. Never block the fuel cell vent. Make sure the return hose has no kinks or restrictions and connects to the correct return port rather than the feed outlet.
Prime and pressure-test the closed system. Complete all hose connections before energizing the pump. Add fuel, briefly cycle the pump using a properly fused relay circuit and inspect every connection while the system is pressurized. Do not loosen or disconnect fittings while the pump is operating or the system is under pressure.
Safety Notice: Fuel-system installation involves flammable liquids, electrical wiring and pressurized plumbing. Installation should be completed by someone experienced with automotive EFI systems. Work in a well-ventilated area, keep ignition sources away and perform a complete leak inspection before starting or driving the vehicle.
Tips for taking the cap off:
Why Choose the EVIL ENERGY Standard Fuel Cell Kit?
Universal Fit for Custom Builds: Instead of shopping by vehicle make and model, you can select the tank based on available space, fuel demand and intended use. This universal fuel cell kit works well for LS swaps, classic cars, pickup trucks, off-road rigs and race cars. Because it is designed for custom installation rather than direct-fit replacement, always verify tank dimensions, mounting points and clearance before ordering.
Choose from 5-, 10- or 15-Gallon Tanks: The 5-gallon tank is a compact, lightweight option for drag racing and short-duration use. The 10-gallon tank offers a practical balance of capacity and size for drift, autocross and street/strip builds. The 15-gallon tank is better suited for off-road vehicles, restomods and higher-consumption builds that need more operating range.
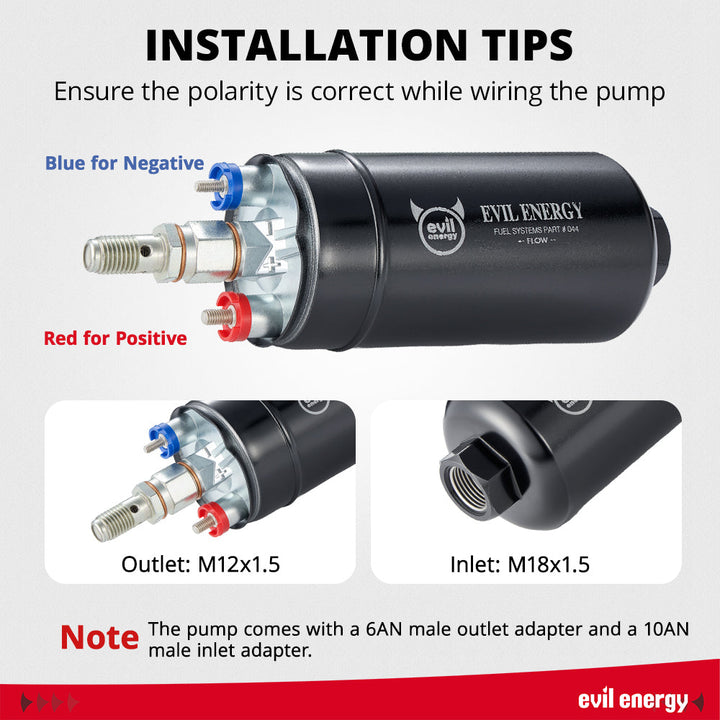
300 LPH External Inline Fuel Pump: The included 12V pump delivers up to 300 LPH at 43 PSI and 13.5V, making it a strong starting point for many EFI performance builds. External mounting provides more flexibility when routing the fuel system and allows the pump to be serviced without dropping the tank. For reliable fuel delivery, mount the pump low and close to the tank, and confirm that its flow at your actual fuel pressure supports the engine’s horsepower and fuel requirements.
20 ft of 6AN Fuel Hose: The included 6AN (3/8 in) fuel hose provides enough length for many supply-and-return layouts. Because 6AN is a common size in aftermarket fuel systems, compatible hose ends, adapters and replacement parts are widely available. Measure the planned routing before installation to make sure 20 ft covers both lines.
Two-Stage Fuel Filtration: The 100-micron pre-pump filter catches larger debris before it enters the fuel pump, while the 10-micron post-pump filter provides finer protection for the pressure regulator and fuel injectors.
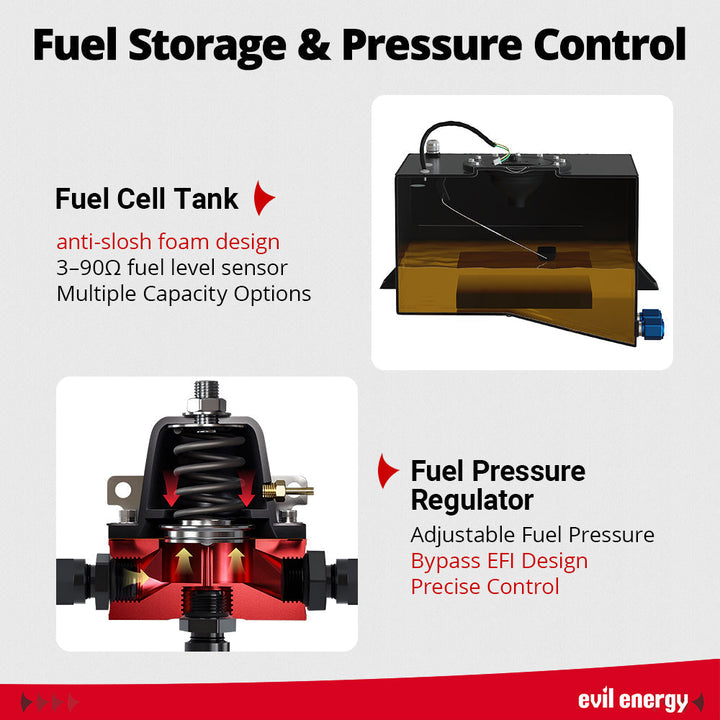
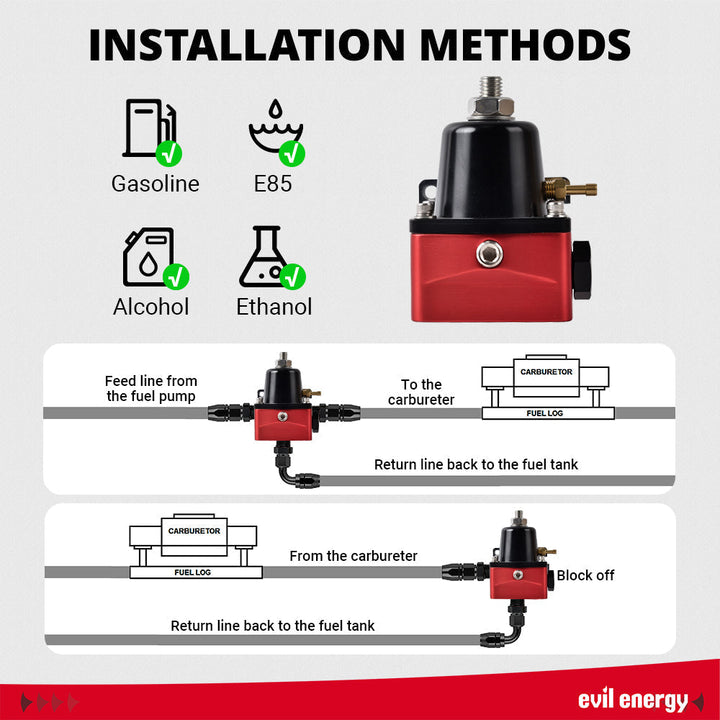
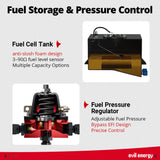
Adjustable Return-Style Fuel Pressure Regulator: The bypass regulator sends unused fuel back to the tank and helps maintain consistent fuel pressure as engine demand changes. Compared with a deadhead-style setup, a properly installed return system reduces the load created when the pump works against a closed outlet and supports more stable EFI fuel delivery.
Three 6AN Hose Options: Choose CPE fuel line for an affordable and flexible hose option in conventional gasoline systems. Choose PTFE fuel line for better chemical resistance and lower fuel-vapor permeation in gasoline, E85 or methanol applications. Conductive PTFE adds a conductive inner liner to help dissipate static electricity in applications where static buildup is a concern.
We also prioritize quality control, ensuring each component meets rigorous standards for perfect fitment and durability, effectively addressing common fuel system challenges faced by car enthusiasts.
Enhanced Performance: Our products boost efficiency and power for your modified engine.
Professional Grade: Ideal for serious modifiers seeking reliable and high-performance upgrades.
Fast Shipping: Orders are processed within 1-2 business days for quick delivery.
Easy Returns: Enjoy a hassle-free 90-day return policy with free return shipping (Requires no use or installation, packaging intact). 90-180 days will be charged a 15% operating fee.
Warranty: EVIL ENERGY provides 1-year warranty on this kit. For questions, reach out to us via email.
Read the complete installation manual and the applicable vehicle service manual. Follow only the steps for components included in your kit, and skip sections for components not supplied.
Confirm the vehicle uses an electronic fuel injection (EFI) system.
Inspect the kit and verify all components and hardware are present and undamaged.
Work in a well-ventilated area away from flames, sparks, hot surfaces, and other ignition sources.
Relieve fuel system pressure, turn the ignition OFF, allow the engine to cool, and disconnect the negative battery cable.
Support the vehicle securely with jack stands and keep an approved fire extinguisher nearby.
Installation Steps
Relieve fuel system pressure and remove the old fuel filter, fuel pump, and fuel pressure regulator as required.
Position and securely mount the fuel cell with clearance from exhaust, suspension, driveshaft, and moving components.
Mount the fuel pump close to and preferably at or below the fuel cell, using the supplied bracket and rubber isolators.
Install the 100-micron and 10-micron fuel filters in the direction shown by their flow arrows.
Mount the fuel pressure regulator away from heat, install the pressure gauge in the 1/8-inch NPT port, and connect the vacuum/boost reference hose if used.
Measure, cut, deburr, and assemble the supplied CPE or PTFE fuel hose and AN fittings; pressure-test each completed hose assembly.
Connect the return-style system in this order: fuel cell, 100-micron filter, fuel pump, 10-micron filter, fuel rail, fuel pressure regulator, return line, fuel cell.
Reconnect electrical connections and secure all hoses and wiring away from heat, sharp edges, and moving parts.
Prime the system, check every connection for leaks, start the engine, and adjust fuel pressure only while monitoring the gauge.
Test-drive the vehicle and complete the final leak inspection.
Post-Installation Verification
Confirm the fuel cell, pump, filters, regulator, hoses, fittings, wiring, and mounting hardware are secure.
Verify each filter and the fuel pump are oriented in the correct flow direction.
Confirm hoses are not kinked, twisted, under tension, or exposed to exhaust heat, sharp edges, or moving parts.
Prime the fuel system and inspect all connections for leaks before starting the engine.
Adjust fuel pressure only with the gauge connected, then tighten the regulator adjustment jam nut.
Recheck for leaks with the engine warm, after the road test, and again after 50-100 km.
Troubleshooting
Engine will not start: check the pump fuse, power, wiring, ground, fuel pressure, filter condition, and fuel-line routing.
Low fuel pressure: inspect for leaks, verify filter direction, replace clogged filters, and check regulator adjustment.
High fuel pressure: verify regulator adjustment and inspect the return line for kinks or restrictions.
Fuel leak: switch the ignition OFF immediately, clean spilled fuel, and repair loose or damaged hoses and fittings before operation.
Noisy fuel pump: verify secure mounting, rubber isolation, correct location near the fuel cell, and an unrestricted inlet supply.
Fluctuating fuel pressure: inspect for air leaks and verify the vacuum/boost reference connection.
Maintenance
Inspect the complete fuel system after the initial road test and periodically thereafter.
Recheck all connections after 50-100 km and retighten loose fittings without overtightening AN fittings.
Replace any leaking, damaged, clogged, or improperly installed component before operating the vehicle.
Dive into the anatomy of performance fuel systems with this comprehensive visual guide. We explore detailed car fuel tank diagrams, the engineering behind gas tank baffles, and the plumbing essentials of car fuel line diagrams. Learn why PTFE fuel lines are...
Fuel system optimization is the heart of automotive excellence. Whether you’re prepping an LS swap or restoring a classic, understanding the mechanics of your gas fuel system is vital for reliability and power. This comprehensive guide breaks down the anato...
A 15-gallon fuel cell typically envelopes ~25×18×10 in and works well for drift, track day, street-strip, LS swaps, and classic replacements. For plumbing, a PTFE fuel line hose is the safest all-round choice (E10/E85 compatible). Most street/track builds r...
How many gallons does your fuel cell actually need? This guide covers the sizing math, horsepower based estimates, and capacity recommendations across drag, drift, track, street, and off road use.
This comprehensive guide dives into the engineering logic of high-performance fuel systems for demolition derby. From selecting 0.125-inch aluminum alloys to mastering Aluminum TIG Welding Repair, we cover everything needed to build a 'survival cell' for th...
Ultimate Fuel System Safety Upgrade: A fuel safe tank is a high-integrity, crash-survivable containment system designed to prevent leaks and ignition during high-speed impacts. Engineered with a T6061-T6 aluminum fuel cell shell and internal safety bladders...
Is your engine stalling, misfiring, or struggling to start? These common fuel pressure issues often point to a single culprit: a faulty fuel regulator. This comprehensive guide serves as your diagnostic hub for identifying fuel regulator symptoms across cla...
Building a reliable LS swap fuel system is the most critical step in ensuring your engine conversion runs smoothly. Whether you are dropping a 5.3L or a 6.0L into a classic chassis, your Fuel System Solutions must handle high-pressure EFI requirements.
If y...
What Is a Fuel Cell?
Fuel cells are specialized fuel storage units often used in motorsports, off-road racing, and performance builds. While the term 'fuel cell' may remind people of hydrogen fuel cells used for energy conversion, in the context of automoti...
The Complete Guide for Performance and Racing Applications
When people hear the term fuel cell, they often think of hydrogen-powered electric vehicles. But in the automotive performance world, a fuel cell refers to a high-safety fuel storage tank, engineere...
This guide will help you understand what fuel cells are, how they work, their types, advantages, and disadvantages. Whether you're a car enthusiast, a potential buyer, or just curious about this innovative technology, you'll find valuable information here.
Q: What's the difference between an EVIL ENERGY Auto Fuel Cell and a factory automotive fuel tank?
A: In the performance aftermarket, an Auto Fuel Cell is a tank built for storing and delivering liquid fuel in a custom fuel system. Don't confuse it with a hydrogen fuel cell powertrain. They're completely different. Here's how the EVIL ENERGY Auto Fuel Cell compares to a factory tank:
Fitment: Universal, custom-install vs. vehicle-specific design
Fuel pump: External inline fuel pump vs. pump typically integrated into the in-tank module
Fuel lines: Custom 6AN feed and return lines vs. factory hard lines and quick-connect fittings
Fuel level system: Standalone sender that must be matched to your gauge vs. integrated factory gauge system
Venting: Planned at install vs. usually tied into the factory EVAP system
Primary use: Racing, engine swaps, restomods, and custom builds vs. factory repair and direct replacement
Installation: Requires measuring, fabrication, and system matching vs. factory mounting points
Note on "Universal": it means the tank and components work across many custom projects — it does not mean it drops into every car, and it doesn't guarantee direct compatibility with factory fuel gauges, fuel rails, or EVAP systems.
Q: What is the purpose of an automotive fuel tank?
A: The primary job of an automotive fuel tank is to store liquid fuel and deliver a controlled, consistent supply to the engine. It also has to handle fuel thermal expansion, keep the system properly vented, provide a stable pick-up position, and support fuel level monitoring.
Inside the EVIL ENERGY Auto Fuel Cell, anti-slosh foam reduces fuel sloshing under acceleration, braking, and cornering. The fuel level sender outputs a signal to a compatible gauge, and the separate outlet, return, and vent ports let you build a custom return-style fuel system.
Unlike a vehicle-specific factory tank, this universal fuel cell does not replicate factory mounting points, EVAP connections, or electrical interfaces. The installer needs to plan support structure, vent routing, rollover protection, feed/return lines, and gauge compatibility, and confirm what your vehicle or racing-series rules require.
Q: What fuel tank accessories do I need for my build?
A: Beyond what's already in this EVIL ENERGY Fuel Cell Kit (tank, fuel pump, dual-stage filters, regulator, and 6AN fuel line), most custom installs need extra accessories depending on your routing:
6AN hose ends: straight, 45°, 90°, or 180°
Vent line and rollover valve
Fuel pump relay, fuse, wire, and electrical terminals
Fuel gauge matched to your sender's resistance
Fuel pressure gauge
Tank support frame, mounting plate, or straps
Fuel rail, throttle body, or engine-specific adapters
Extra line when 20 ft isn't enough for feed and return
Heat sleeve, split loom, and abrasion protection
AN assembly tools and thread sealant for NPT fittings
Do not use PTFE tape or thread sealant on AN flared sealing surfaces. Measure your full feed, return, and vent routing before buying fittings or cutting line.
Q: What are common fuel tank parts problems, and how do I fix them?
A: Most fuel system issues come down to incorrect line routing, clogged filters, insufficient power supply, or mismatched components. Here's how to diagnose the common ones:
Noisy pump or weak pickup: pump mounted too high, clogged pre-pump filter, blocked vent, or low fuel. → Mount the pump lower and closer to the tank, check the 100-micron filter, and confirm venting is clear.
Pressure drop under load: clogged filters, low pump voltage, insufficient flow, or wrong line size. → Check both filters, measure pump voltage under load, and confirm it meets the engine's fuel demand.
Fuel smell or visible leak: damaged line, loose fitting, scratched AN flare, failed seal, or incompatible material. → Depressurize and inspect sealing surfaces; replace damaged or incompatible components.
Gauge backwards or inaccurate: sender/gauge resistance mismatch, bad ground, or stuck float. → Verify sender resistance, improve the ground, and test float through full travel.
Engine cuts out in corners: low fuel, degraded foam, exposed pickup, or blocked vent. → Keep enough reserve; check the foam, pickup position, and venting.
Pump overheating: fine filter installed before the pump, high inlet restriction, or low supply voltage. → Confirm the 100-micron filter is pre-pump and the 10-micron is post-pump.
Can't adjust fuel pressure: wrong regulator ports, blocked return line, or wrong pressure range. → Verify inlet/outlet/return ports and that the regulator matches the system.
Never use an open flame to find a fuel leak, and never start the engine with visible fuel present. If you can't isolate the fault with safe pressure, flow, and electrical tests, have a professional inspect the system.
Q: How do I maintain the kit after purchase?
A: Everyday checks: Before each track day or long trip, do a visual once-over, check all line fittings for seepage, make sure high-pressure lines aren't contacting heat sources like the exhaust, and confirm clamps are tight. After the first start, re-check post-pump pressure at idle and listen for abnormal pump noise.
Scheduled maintenance: Replace the post-pump 10-micron fine filter every 2 years or ~12,500 miles; inspect the pre-pump 100-micron coarse filter and replace it if the screen is damaged or flow drops.
Every 3–5 years, check the anti-slosh foam for aging or crumbling (debris will clog filters fast) and check the fill cap seal for hardening. If the level sender reading jumps, clean the float-arm contacts or replace the sender.
Long-term storage: If the car sits for more than 30 days, keep the tank 1/2 to 3/4 full to reduce condensation, and disconnect the pump relay to prevent accidental starts. Before the first restart, cycle the pump 2–3 times (about 3 seconds each) to build pressure and purge air from the lines, then start. After starting, idle for 5+ minutes and check every fitting and line for leaks.


![[CPE]](http://www.ievilenergy.com/cdn/shop/files/EVIL-ENERGY-Fuel-Cell-Tank-Kits-Efficient-Fuel-System-Solutions-5-10-15-Gallon-EVIL-ENERGY-168944351_720x.progressive.jpg?v=1781889208)
![[PTFE]](http://www.ievilenergy.com/cdn/shop/files/EVIL-ENERGY-Fuel-Cell-Tank-Kits-Efficient-Fuel-System-Solutions-5-10-15-Gallon-EVIL-ENERGY-168944416_720x.progressive.jpg?v=1781889210)
![[Antistatic PTFE]](http://www.ievilenergy.com/cdn/shop/files/EVIL-ENERGY-Fuel-Cell-Tank-Kits-Efficient-Fuel-System-Solutions-5-10-15-Gallon-EVIL-ENERGY-168944561_720x.progressive.jpg?v=1781889214)
![[PTFE] EVIL ENERGY complete PTFE fuel system kit with 20FT 6AN fuel line, fuel cell tank, 300LPH inline fuel pump, fuel pressure regulator, 10 and 100 micron inline fuel filters, AN fittings, and mounting brackets.](http://www.ievilenergy.com/cdn/shop/files/EVIL-ENERGY-Fuel-Cell-Tank-Kits-Efficient-Fuel-System-Solutions-5-10-15-Gallon-EVIL-ENERGY-168947150_720x.progressive.jpg?v=1781889256)
![[CPE] EVIL ENERGY complete CPE fuel system kit with 20FT 6AN CPE fuel line, fuel cell gas tank, 300LPH inline fuel pump, fuel pressure regulator, 10 and 100 micron inline fuel filters, AN fittings, and mounting brackets.](http://www.ievilenergy.com/cdn/shop/files/EVIL-ENERGY-Fuel-Cell-Tank-Kits-Efficient-Fuel-System-Solutions-5-10-15-Gallon-EVIL-ENERGY-168947215_720x.progressive.jpg?v=1781889259)
![[Antistatic PTFE]](http://www.ievilenergy.com/cdn/shop/files/EVIL-ENERGY-Fuel-Cell-Tank-Kits-Efficient-Fuel-System-Solutions-5-10-15-Gallon-EVIL-ENERGY-168947194_720x.progressive.webp.jpg?v=1772270876)


![EVIL ENERGY Fuel Cell Gas Tank with Level Sender Black Street Drift Aluminum[5 Gallon]](http://www.ievilenergy.com/cdn/shop/files/EVIL-ENERGY-Upgraded-Aluminum-Fuel-Line-Kits-Efficient-Fuel-System-Solutions-15-Gallon-EVIL-ENERGY-169634288_720x.progressive.jpg?v=1781889434)
![EVIL ENERGY Fuel Cell Gas Tank with Level Sender Black Street Drift Aluminum[10 Gallon]](http://www.ievilenergy.com/cdn/shop/files/EVIL-ENERGY-Upgraded-Aluminum-Fuel-Line-Kits-Efficient-Fuel-System-Solutions-15-Gallon-EVIL-ENERGY-169634325_720x.progressive.jpg?v=1781889436)
![[15 Gallon]](http://www.ievilenergy.com/cdn/shop/files/EVIL-ENERGY-Upgraded-Aluminum-Fuel-Line-Kits-Efficient-Fuel-System-Solutions-15-Gallon-EVIL-ENERGY-169634443_720x.progressive.jpg?v=1781889438)
![[CPE]](http://www.ievilenergy.com/cdn/shop/files/EVIL-ENERGY-Fuel-Cell-Tank-Kits-Efficient-Fuel-System-Solutions-5-10-15-Gallon-EVIL-ENERGY-168946485_720x.progressive.jpg?v=1781889243)
![[PTFE]](http://www.ievilenergy.com/cdn/shop/files/EVIL-ENERGY-Fuel-Cell-Tank-Kits-Efficient-Fuel-System-Solutions-5-10-15-Gallon-EVIL-ENERGY-168946536_720x.progressive.jpg?v=1781889246)
![[CPE With Fittings]](http://www.ievilenergy.com/cdn/shop/files/EVIL-ENERGY-Upgraded-Aluminum-Fuel-Line-Kits-Efficient-Fuel-System-Solutions-15-Gallon-EVIL-ENERGY-169634564_720x.progressive.jpg?v=1781889439)
![[PTFE With Fittings]](http://www.ievilenergy.com/cdn/shop/files/EVIL-ENERGY-Upgraded-Aluminum-Fuel-Line-Kits-Efficient-Fuel-System-Solutions-15-Gallon-EVIL-ENERGY-169634675_720x.progressive.jpg?v=1781889441)

![[Antistatic PTFE]](http://www.ievilenergy.com/cdn/shop/files/EVIL-ENERGY-Upgraded-Aluminum-Fuel-Line-Kits-Efficient-Fuel-System-Solutions-15-Gallon-EVIL-ENERGY-169634819_720x.progressive.jpg?v=1781889447)
![[Antistatic PTFE With Fittings]](http://www.ievilenergy.com/cdn/shop/files/EVIL-ENERGY-Upgraded-Aluminum-Fuel-Line-Kits-Efficient-Fuel-System-Solutions-15-Gallon-EVIL-ENERGY-169634923_720x.progressive.jpg?v=1781889448)

![Works with CPE fuel lines — includes AN swivel hose ends for 0°, 45°, 90°, and 360° rotation, enabling fast, hassle-free installation.[CPE]](http://www.ievilenergy.com/cdn/shop/files/EVIL-ENERGY-Upgraded-Aluminum-Fuel-Line-Kits-Efficient-Fuel-System-Solutions-15-Gallon-EVIL-ENERGY-169635191_720x.progressive.jpg?v=1781889452)
![Compatible with PTFE fuel lines — includes AN swivel hose ends for 0°, 45°, 90°, and full 360° rotation, ensuring quick and effortless installation.[PTFE]](http://www.ievilenergy.com/cdn/shop/files/EVIL-ENERGY-Upgraded-Aluminum-Fuel-Line-Kits-Efficient-Fuel-System-Solutions-15-Gallon-EVIL-ENERGY-169635240_720x.progressive.jpg?v=1781889453)
![[PTFE]](http://www.ievilenergy.com/cdn/shop/files/EVIL-ENERGY-Fuel-Cell-Tank-Kits-Efficient-Fuel-System-Solutions-5-10-15-Gallon-EVIL-ENERGY-168947941_720x.progressive.jpg?v=1781889273)
![[CPE]](http://www.ievilenergy.com/cdn/shop/files/EVIL-ENERGY-Fuel-Cell-Tank-Kits-Efficient-Fuel-System-Solutions-5-10-15-Gallon-EVIL-ENERGY-168948040_720x.progressive.jpg?v=1781889275)
![[PTFE With Fittings]](http://www.ievilenergy.com/cdn/shop/files/EVIL-ENERGY-Fuel-Cell-Tank-Kits-Efficient-Fuel-System-Solutions-5-10-15-Gallon-EVIL-ENERGY-168948127_720x.progressive.jpg?v=1781889278)











![[CPE]](http://www.ievilenergy.com/cdn/shop/files/EVIL-ENERGY-Fuel-Cell-Tank-Kits-Efficient-Fuel-System-Solutions-5-10-15-Gallon-EVIL-ENERGY-168944351_1200x.jpg?v=1781889208)
![[CPE]](http://www.ievilenergy.com/cdn/shop/files/EVIL-ENERGY-Fuel-Cell-Tank-Kits-Efficient-Fuel-System-Solutions-5-10-15-Gallon-EVIL-ENERGY-168944351.jpg?v=1781889208 "[CPE]")
![[PTFE]](http://www.ievilenergy.com/cdn/shop/files/EVIL-ENERGY-Fuel-Cell-Tank-Kits-Efficient-Fuel-System-Solutions-5-10-15-Gallon-EVIL-ENERGY-168944416.jpg?v=1781889210 "[PTFE]")
![[Antistatic PTFE]](http://www.ievilenergy.com/cdn/shop/files/EVIL-ENERGY-Fuel-Cell-Tank-Kits-Efficient-Fuel-System-Solutions-5-10-15-Gallon-EVIL-ENERGY-168944561.jpg?v=1781889214 "[Antistatic PTFE]")

![[PTFE] EVIL ENERGY complete PTFE fuel system kit with 20FT 6AN fuel line, fuel cell tank, 300LPH inline fuel pump, fuel pressure regulator, 10 and 100 micron inline fuel filters, AN fittings, and mounting brackets.](http://www.ievilenergy.com/cdn/shop/files/EVIL-ENERGY-Fuel-Cell-Tank-Kits-Efficient-Fuel-System-Solutions-5-10-15-Gallon-EVIL-ENERGY-168947150.jpg?v=1781889256 "[PTFE] EVIL ENERGY complete PTFE fuel system kit with 20FT 6AN fuel line, fuel cell tank, 300LPH inline fuel pump, fuel pressure regulator, 10 and 100 micron inline fuel filters, AN fittings, and mounting brackets.")
![[CPE] EVIL ENERGY complete CPE fuel system kit with 20FT 6AN CPE fuel line, fuel cell gas tank, 300LPH inline fuel pump, fuel pressure regulator, 10 and 100 micron inline fuel filters, AN fittings, and mounting brackets.](http://www.ievilenergy.com/cdn/shop/files/EVIL-ENERGY-Fuel-Cell-Tank-Kits-Efficient-Fuel-System-Solutions-5-10-15-Gallon-EVIL-ENERGY-168947215.jpg?v=1781889259 "[CPE] EVIL ENERGY complete CPE fuel system kit with 20FT 6AN CPE fuel line, fuel cell gas tank, 300LPH inline fuel pump, fuel pressure regulator, 10 and 100 micron inline fuel filters, AN fittings, and mounting brackets.")
![[Antistatic PTFE]](http://www.ievilenergy.com/cdn/shop/files/EVIL-ENERGY-Fuel-Cell-Tank-Kits-Efficient-Fuel-System-Solutions-5-10-15-Gallon-EVIL-ENERGY-168947194.webp?v=1772270876 "[Antistatic PTFE]")


![EVIL ENERGY Fuel Cell Gas Tank with Level Sender Black Street Drift Aluminum[5 Gallon]](http://www.ievilenergy.com/cdn/shop/files/EVIL-ENERGY-Upgraded-Aluminum-Fuel-Line-Kits-Efficient-Fuel-System-Solutions-15-Gallon-EVIL-ENERGY-169634288.jpg?v=1781889434 "EVIL ENERGY Fuel Cell Gas Tank with Level Sender Black Street Drift Aluminum[5 Gallon]")
![EVIL ENERGY Fuel Cell Gas Tank with Level Sender Black Street Drift Aluminum[10 Gallon]](http://www.ievilenergy.com/cdn/shop/files/EVIL-ENERGY-Upgraded-Aluminum-Fuel-Line-Kits-Efficient-Fuel-System-Solutions-15-Gallon-EVIL-ENERGY-169634325.jpg?v=1781889436 "EVIL ENERGY Fuel Cell Gas Tank with Level Sender Black Street Drift Aluminum[10 Gallon]")
![[15 Gallon]](http://www.ievilenergy.com/cdn/shop/files/EVIL-ENERGY-Upgraded-Aluminum-Fuel-Line-Kits-Efficient-Fuel-System-Solutions-15-Gallon-EVIL-ENERGY-169634443.jpg?v=1781889438 "[15 Gallon]")
![[CPE]](http://www.ievilenergy.com/cdn/shop/files/EVIL-ENERGY-Fuel-Cell-Tank-Kits-Efficient-Fuel-System-Solutions-5-10-15-Gallon-EVIL-ENERGY-168946485.jpg?v=1781889243 "[CPE]")
![[PTFE]](http://www.ievilenergy.com/cdn/shop/files/EVIL-ENERGY-Fuel-Cell-Tank-Kits-Efficient-Fuel-System-Solutions-5-10-15-Gallon-EVIL-ENERGY-168946536.jpg?v=1781889246 "[PTFE]")
![[CPE With Fittings]](http://www.ievilenergy.com/cdn/shop/files/EVIL-ENERGY-Upgraded-Aluminum-Fuel-Line-Kits-Efficient-Fuel-System-Solutions-15-Gallon-EVIL-ENERGY-169634564.jpg?v=1781889439 "[CPE With Fittings]")
![[PTFE With Fittings]](http://www.ievilenergy.com/cdn/shop/files/EVIL-ENERGY-Upgraded-Aluminum-Fuel-Line-Kits-Efficient-Fuel-System-Solutions-15-Gallon-EVIL-ENERGY-169634675.jpg?v=1781889441 "[PTFE With Fittings]")

![[Antistatic PTFE]](http://www.ievilenergy.com/cdn/shop/files/EVIL-ENERGY-Upgraded-Aluminum-Fuel-Line-Kits-Efficient-Fuel-System-Solutions-15-Gallon-EVIL-ENERGY-169634819.jpg?v=1781889447 "[Antistatic PTFE]")
![[Antistatic PTFE With Fittings]](http://www.ievilenergy.com/cdn/shop/files/EVIL-ENERGY-Upgraded-Aluminum-Fuel-Line-Kits-Efficient-Fuel-System-Solutions-15-Gallon-EVIL-ENERGY-169634923.jpg?v=1781889448 "[Antistatic PTFE With Fittings]")


![Works with CPE fuel lines — includes AN swivel hose ends for 0°, 45°, 90°, and 360° rotation, enabling fast, hassle-free installation.[CPE]](http://www.ievilenergy.com/cdn/shop/files/EVIL-ENERGY-Upgraded-Aluminum-Fuel-Line-Kits-Efficient-Fuel-System-Solutions-15-Gallon-EVIL-ENERGY-169635191.jpg?v=1781889452 "Works with CPE fuel lines — includes AN swivel hose ends for 0°, 45°, 90°, and 360° rotation, enabling fast, hassle-free installation.[CPE]")
![Compatible with PTFE fuel lines — includes AN swivel hose ends for 0°, 45°, 90°, and full 360° rotation, ensuring quick and effortless installation.[PTFE]](http://www.ievilenergy.com/cdn/shop/files/EVIL-ENERGY-Upgraded-Aluminum-Fuel-Line-Kits-Efficient-Fuel-System-Solutions-15-Gallon-EVIL-ENERGY-169635240.jpg?v=1781889453 "Compatible with PTFE fuel lines — includes AN swivel hose ends for 0°, 45°, 90°, and full 360° rotation, ensuring quick and effortless installation.[PTFE]")
![[PTFE]](http://www.ievilenergy.com/cdn/shop/files/EVIL-ENERGY-Fuel-Cell-Tank-Kits-Efficient-Fuel-System-Solutions-5-10-15-Gallon-EVIL-ENERGY-168947941.jpg?v=1781889273 "[PTFE]")
![[CPE]](http://www.ievilenergy.com/cdn/shop/files/EVIL-ENERGY-Fuel-Cell-Tank-Kits-Efficient-Fuel-System-Solutions-5-10-15-Gallon-EVIL-ENERGY-168948040.jpg?v=1781889275 "[CPE]")
![[PTFE With Fittings]](http://www.ievilenergy.com/cdn/shop/files/EVIL-ENERGY-Fuel-Cell-Tank-Kits-Efficient-Fuel-System-Solutions-5-10-15-Gallon-EVIL-ENERGY-168948127.jpg?v=1781889278 "[PTFE With Fittings]")


 Safety Notice:
 Tips for taking the cap off:


